RFID Tweeter
In this simple example of the "Internet of Things", we show you how to trigger a tweet from your mbed using an RFID tag.
Hardware Components
For this example, we use:
- An mbed!
- An ID-12 Innovations RFID reader
- An RJ-45 Socket
- A breadboard + some wires
Library Components
To drive these hardware components and to talk to twitter, we use the following libraries:
Hardware Setup
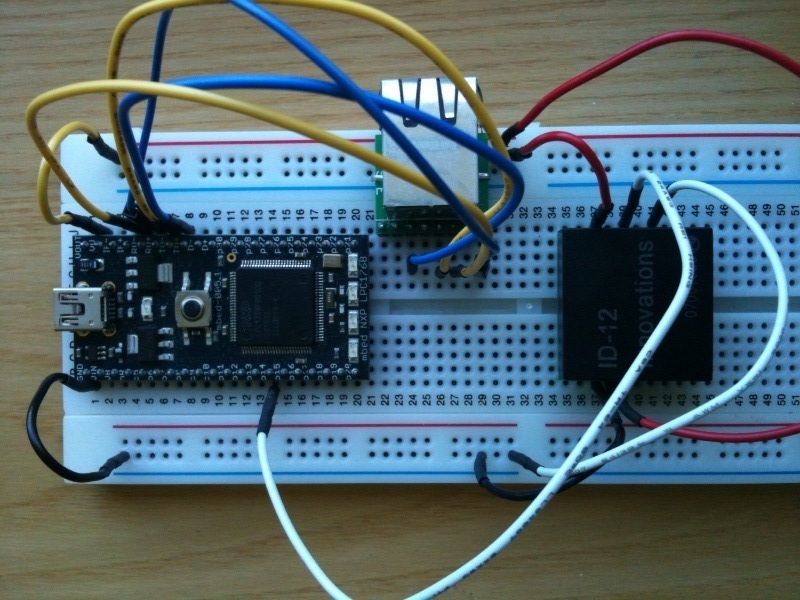
Here is the setup we are going to use:

First of all, plug your mbed into the breadboard. Connect the ground (GND) pin with the breadboard's ground line and the USB power pin ((VU) to the power line.
RFID Reader
- Connect the 5V (pin 11) and RST (pin 2) pins to the power line
- Connect the GND (pin 1) and FS (pin 7) pins to the ground line
- Finally connect the D0 (pin 9) pin to the p14 pin of the mbed (which is a serial input pin)
Ethernet Socket
- Connect the socket's pin 3 to the mbed's RD- pin
- Connect the socket's pin 1 to the mbed's RD+ pin
- Connect the socket's pin 4 to the mbed's TD- pin
- Connect the socket's pin 6 to the mbed's TD+ pin
Warning
The socket's pinout is valid for this part. If you are using a different one, be sure to check if the pinout is not different.
Then plug a network cable into the socket, and connect your mbed to your computer!
Software
Information
The basic authentication service for twitter is going down at the end of the week. To continue using that program, the code has been updated to use http://supertweet.net which acts as an API proxy. Simply visit the website to setup your twitter account for this API. See: http://www.supertweet.net/about/documentation
The full program including the libraries is published here:
Here is the main code form that program for reference:
main.cpp
// RFID Tweeter

#include "mbed.h"
#include "ID12RFID.h"
#include "EthernetNetIf.h"
#include "HTTPClient.h"

#define TWITTER_USER "donatiengarnier"
#define TWITTER_PASSWORD "myverysecurepassword"

#define IDS_COUNT 3
const int ids_list[IDS_COUNT] = {89481809, 89481810, 89481811};
const char* names_list[IDS_COUNT] = {"Donatien", "Simon", "Dan"};

EthernetNetIf ethernet;
HTTPClient twitter;

ID12RFID rfid(p14);
DigitalOut tag_present(LED1);
DigitalOut tweet_ok(LED4);

int main() {
  ethernet.setup();
  twitter.basicAuth(TWITTER_USER, TWITTER_PASSWORD);

  while(true) {
    int id = rfid.read();
    tag_present = 1;
    for(int i = 0; i < IDS_COUNT; i++) {
      if (ids_list[i] == id) {
        HTTPMap msg;
        msg["status"] = names_list[i];
        msg["status"] += " just arrived home!";
        HTTPResult r = twitter.post("http://api.supertweet.net/1/statuses/update.xml", msg, NULL);
        tweet_ok = !r;
      }
    }
    tag_present = 0;
  }
}
Setting up for your own twitter account and tags
The program requires some configuration for your own setup
- Replace the TWITTER_USER and TWITTER_PASSWORD macros with your account's parameters
- Change the registered tag ids and their owners in the ids_list and names_list tables
- Update the IDS_COUNT define accordingly
- Personalize the message (msg["status"]) a bit...
Finally
Compile the program and download it to your mbed. Press the reset button, and it should spring in to life!
Hopefully this can be used as an easy reference for creating all sorts of "Internet of Things" applications.
