OneWireCRC
.:Intro:.
This library fulfills two purposes - firstly to provide general 1-wire support for mbed (OneWireCRC.h/.cpp + OneWireDefs.h), and secondly to provide support for 1-wire thermometers DS18B20 and DS18S20 (OneWireThermometer.h/.cpp, DS18B20.h/.cpp, DS18S20.h/.cpp).
The DS18B20 is for current designs and supports 9, 10, 11 or 12 bits temperature read-out resolutions. The DS18S20 is a drop-in replacement for the older DS1820, and fundementally has a 9 bit resolution which can be enhanced. They are fundementally the same except for switchable resolutions and code for dealing with their read-outs.
Design-wise both the DS18B20 and DS18S20 could have be coded as one class, with functional paths being switched according the device type, but I decided to go for a class (inheritance) structure, with functionality being switched polymorphically. Anyway its kinda' cooler than a bunch of IF ELSE statements, but involves a class hierarchy maintenance overhead.
The Maxim/Dallas documentation for these devices can be found at http://datasheets.maxim-ic.com/en/ds/DS18B20.pdf and http://datasheets.maxim-ic.com/en/ds/DS18S20.pdf, and are well worth reading through to get a feel for their operation.
The 1-wire code itself (OneWireCRC.h/.cpp) started out as a port of Jim Studt's Arduino library (which in turn was a port of Dallas code). While doing so I ended up refering to the Maxim/Dallas Application Note 126 - 1-Wire Communication Through Software (http://pdfserv.maxim-ic.com/en/an/AN126.pdf), and restored part of the code to that recommended in the application note, including all the recommend bus timings. Another recommend 1-wire document which has a full decription of the 1-wire bus architecture is Application Note 937 (http://pdfserv.maxim-ic.com/en/an/appibstd.pdf).
If you want to use parasitic power for these devices, first read my note at http://mbed.org/users/snatch59/notebook/1-wire-parasitic-power/ for an easier way to set this up.
.:How To Use:.
Connections:
The demo uses mbed pin 25. Change the value in main.cpp to suit your preference. This pin should be connected to the DQ (middle) leg of the DS18B20 (or DS18S20). The device's Ground leg should connect to the mbed GND pin, and the Vdd leg to the mbed VU pin (5.0V). Finally a 4.7K ohm resistor should be connected between DQ and Vdd. If in doubt as to which leg is which, check the appropriate data sheet listed in the .:Intro:. above.
The DS18B20/DS18S20 should be positioned at least 6 inches (15 cm) away from the mbed board and the
(4.7K ohm) pull-up resistor, otherwise heat from the mbed board will affect the readings by up to 2 deg C.
This demo uses 5 seconds between readings. To maintain accuracy it is suggested that readings should not
be taken closer than 5 seconds apart, to lessen the effect of heat generated in the device skewing the readings. If doubt - experiment and find out what works for you.
Demo:
The demo is ready to use with the more common DS18B20. To change to a DS18S20 comment out the DS18B20 define, and remove the comment for the DS18S20 define, and re-build. The demo operates with parasitic power off (in this implementation it doesn't really matter as its the same code for both), CRC on, and device addressing on.
CRC on validates returned data by using a CRC check and can be set to false (0). Device addressing is in out of interest, since with one device on the bus, it is kind of academic. However 'useAddress' true (1) will tell you if you have the wrong device connected, and which one you should have connected, as the device address also contains the device type id.
Usage:
Usage is pretty much as set out in main.cpp. setResolution( ) allows you to change the temperature conversion resolution to 9, 10, 11 or 12 bits. If you don't use setResoluton( ) the BS18B20 will run by default in 12 bit mode. Though you can call setResolution( ) for the BS18S20 it doesn't do anything, and it will run in 9 bit + enhanced mode.
If you wish to look at writing code for other Maxim/Dallas 1-wire devices (of which there seems to be less variety these days, with the addressable switch range having been dropped for example), check out OneWireCRC.h/cpp, and OneWireDefs.h to provide your 1-wire bus interface.
#include
#include "DS18S20.h"
#include "DS18B20.h"
#include "OneWireDefs.h"

//#define THERMOMETER DS18S20
#define THERMOMETER DS18B20

int main()
{
    //          device( crcOn, useAddress, parasitic, mbed pin )
    THERMOMETER device(true, true, false, p25);

    while (!device.initialize());    // keep calling until it works

    while (true)
    {
        // changing the resolutions only affects the DS18B20. The DS18S20 is fixed.
        device.setResolution(nineBit);
        device.readTemperature();
        wait(5);
        device.setResolution(tenBit);
        device.readTemperature();
        wait(5);
        device.setResolution(elevenBit);
        device.readTemperature();
        wait(5);
        device.setResolution(twelveBit);
        device.readTemperature();
        wait(5);
    }

    return EXIT_SUCCESS;
}
.:Library Files:.
DS18B20.h - DS18B20 class declaration. Parent is OneWireThermometer.
DS18B20.cpp - DS18B20 source
DS18S20.h - DS18S20 class declaration. Parent is OneWireThermometer.
DS18B20.cpp - DS18S20 source
OneWireCRC.h - OneWireCRC class declaration
OneWireCRC.cpp - OneWireCRC source
OneWireDefs.h - 1-wire bus definitions
OneWireThermometer.h - OneWireThermometer class declaration
OneWireThermometer.cpp - OneWireThermometer source
+ DebugTrace Library: DebugTrace.h / DebugTrace.cpp
.:TODO Wish List:.
1. Use DQ going high to signal end of temperature conversion, rather than waiting for Tconv (as for parasitic power).
2. Add facility for alarms
2. Smart OneWireCRC - just connect any number and type of device and let the code sort out whats there and report back the temperatures.
Just seen this, having just ordered a DS18B20 to play with. You've saved me some work! Cheers
Hi Petras,
I haven't been through all your code, but fore some reason I'm always getting the default value of the 18B20 which is 0x0550. Do you have any clue why ? Also it reports 12 bits while I had called the resolution with 9 bits.
Meanwhile I'll keep looking why...
Thanks
PA
New Scan
Address = 28 a6 78 4d 2 0 0 91
DS18B20 present and correct.
read = 50 5 4b 46 7f ff c 10 1c
read = 50 5 4b 46 7f ff c 10 1c
hex output 0x550
12 bit resolution ...
TEMP_READ/REAL TEMP: 85.000000
Hi - it looks like the Vdd leg of the DS18B20 has not got 5 volts - so you are effectively running on parasitic power. You have two choices here: a. put 5 volts on the Vdd leg, b. change the 4.7K ohm resistor to a 2.7K ohm resistor (as high as 3.3K could work too, or put another 4.7K resistor in parallel with the one you've got for a slightly lower value).
Good luck
Petras
Thanks Petras, that did the trick. Its working fine now. I'm going to try back my own routines for 18B20.. But I will continue using yours, your coding is better than mine :)
By the way, for the other persons interested, you can get free samples of 1-wire devices and other Maxim IC (which I did 2 months ago)
https://shop.maxim-ic.com/storefront/searchsample.do?menuitem=Sample&event=SampleSearchLoad
PA
Hi there,
Just lookig at getting my mbed based thermometer reading and displaying the temperature, however I cannot find the libraries to include for the OneWire stuff. Probably a rookie mistake of mine, so I do apologise in advance.
Cheers
No worries, found the stuff I was looking for...
Hi,
I'm using your libraries to read the temperature values from an DS 18S20 and am getting somewhat interesting results, see attached image. Seems the temperature value tries to avoid a certain range area around the *.5 CEL fractions.
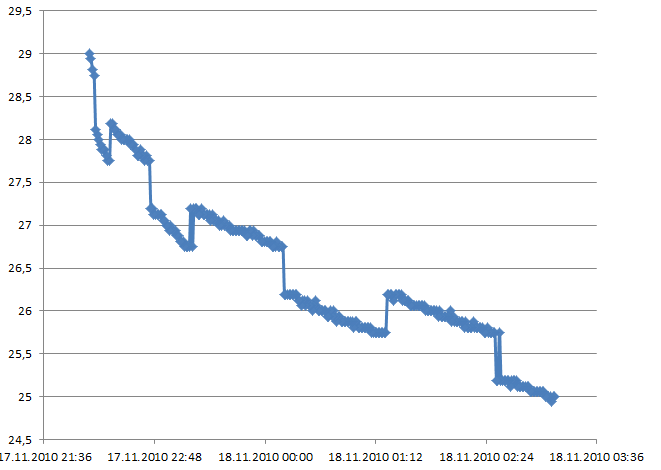
Any ideas?
Cheers, -pl
#
21 Nov 2010 . Edited: 21 Nov 2010
Hi,
I'm using your libraries to read the temperature values from an DS 18S20 and am getting somewhat interesting results, see attached image. Seems the temperature value tries to avoid a certain range area around the *.5 CEL fractions.
...
Any ideas?
Cheers, -pl
Hi!
I have an DS1820 and my values looked quite the same.
I think the problem is with the calculation of the enhanced 9bit calculation in DS18S20::calculateTemperature(BYTE* data)
The manual of my DS1820 says:
"After reading the scratchpad, the TEMP_READ value is obtained by truncating the 0.5�C bit (bit 0) from the temperature data..."
This truncation was missing in the code.
I extended like this - which can be done better, I'm sure :-) :
...
    // convert to real temperature

    // truncate 0,5degree-bit
    read_temp = (read_temp & 0xFFFE);
    readTemp = (float)read_temp/2 ;            // divide by 2

    float tempCount = float(data[COUNT_PER_DEG_BYTE] - data[COUNT_REMAIN_BYTE])/(float)data[COUNT_PER_DEG_BYTE];
...
and now I have a smooth temperature-chart:
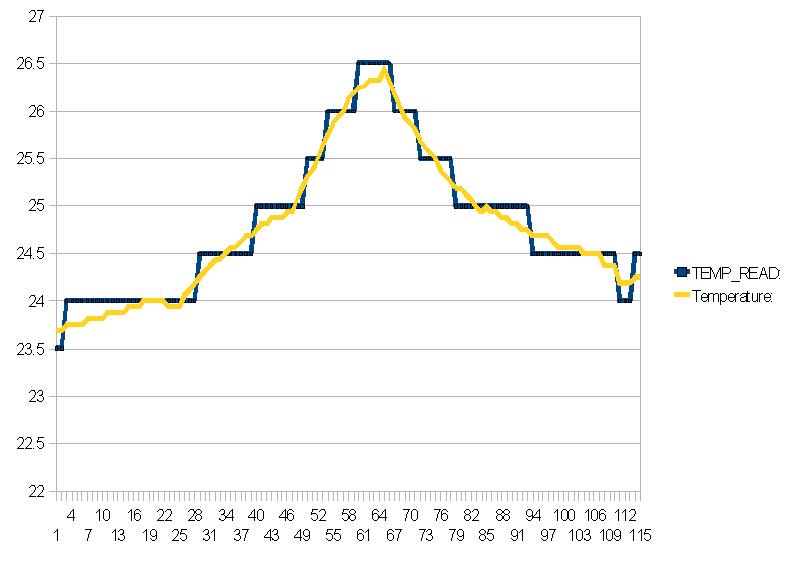
Maybe you can adapt the library, which is great btw.
regards - Charly
#
22 Nov 2010 . Edited: 22 Nov 2010
I extended like this - which can be done better, I'm sure :-)
Hi Charly
You can truncate a bit using a right shift - you lose the bit and divide by two at the same time. So the code could be:
readTemp = (float) (read_temp >> 1);
rather than the original:
float readTemp = (float)read_temp/2 ; // divide by 2
Regards
Daniel
Thanks Guys, that was the right modification - everything is fine for me also; smooooth curves now :-)
Best regards, -pl
Sorry,
maybe I'm blind. But where can I find the Library?
I got only the OneWire.
Br
Hi Thomas, try this: http://mbed.org/users/snatch59/programs/OneWireCRC/gpdz56/docs/files.html
Rgds, -pl
#
08 Dec 2010 . Edited: 09 Dec 2010
thx a lot
now it works, great!
Dear,
for better timing on DS18S20 I had change following statements:
t_device.setResolution(nineBit);
t_device.readTemperature();
// only for DS18B20
#if THERMOMETER == DS18B20
wait(5);
t_device.setResolution(tenBit);
t_device.readTemperature();
wait(5);
t_device.setResolution(elevenBit);
t_device.readTemperature();
wait(5);
t_device.setResolution(twelveBit);
t_device.readTemperature();
#endif
How can you select a different rom Address and not let it search for the first one on the bus?
I am just learning C++ but when I look at the function for THERMOMETER the "useAddress" is defined as a bool variable type so it must be a TRUE or FALSE
I do not see a way to define the address or deviceID
// device( crcOn, useAddress, parasitic, mbed pin )
THERMOMETER device(true, false, false, p25);
Thanks for your help
#
23 Nov 2011 . Edited: 23 Nov 2011
How do I get the library files?
donde
My fault,, I looked at another comment and found the info.
donde
How does main.cpp send the temperatures to a serial terminal? I'm using moserial under Ubuntu. It works just fine. But, I wasted a lot of time trying to use:
Serial pc(USBTX, USBRX) and pc.printf

which didn't work.

Thanks, donde
I tried using this library to read a DS18S20 (non parasitic mode, 5V driven by Mbed VU pin - DQ pulled high with a R4.7K) and for some reason one of the sensors I have always shows a reading of 85 deg, and the other shows 127 deg. Even the device ID it reads seems to be wrong.
If I purposely changed the sample code to the DS18B20 definition - in that scenario it actually shows me the correct device ID but then fails with a you need to use a DS18B20 or some such message, which is ofcourse valid.
The odd part is that if I use this codebase, I am able to get the temperature reading correctly from a single sensor. (exact same circuit)
any idea what might be going on?
Hello:
Where is this library??
Wang
#
31 Mar 2014 . Edited: 31 Mar 2014
http://mbed.org/users/snatch59/code/OneWireCRC/docs/tip/files.html
(Was answered 6 posts before)
But maybe this one is more up to date
https://mbed.org/components/DS1820/
Charly
Thinking of using this sensor. What is the longest cable run you can have with this device. I'm thinking of having sensors in different rooms
which might need up 20 metres of cable.
Brilliant Work.. well done
Hello, is it possible to apply this library to nRF51822 or it works only on LPC1768 and LPC11u24? I just really struggle with connecting DS18B20 to this chip.
#
08 Jun 2017 . Edited: 08 Jun 2017
hi
i have an DS1820 , i use the same code and i have done some changes like: readTemp = (float) (read_temp >> 1);
rather than the original: float readTemp = (float)read_temp/2 ;
and the result is :
if i comment the line while(!device.initialize()
read= ff ff ff ff ff ff ff ff ff
CRC failed);
else the result is:
New scan
No more addresses
any idea what might be going on?
You need to log in to post a comment


 Petras Saduikis
Just seen this, having just ordered a DS18B20 to play with. You've saved me some work! Cheers