uCam Development
I'm working on a project that will involve some image capture and processing so have been looking for a camera module that will interface with the mbed.
At this stage the requirements are:
- Easy to interface to the mbed
- High baud rate so images can the transferred quickly
- Takes picture in a format that is suitable for image processing
- Not too large or expensive
uCam for 4D Systems
So after a bit of searching I found the uCam from 4D Systems which is a small self contained camera module. The module comes in two flavours - a RS-232 and TTL versions. The key points are:
- The TTL version will interface directly to one of the mbed's serial ports
- The TTL version can be powered from the mbed's +3V3 output (pin 40)
- The maximum baud rate is 1228800 bps
- The picture format is programmable and it is capable of taking pictures in RAW format
- The module is 32 mm * 32 mm in size
- It is available in the UK for around £50
The datasheet is available from the 4D Systems website.
Initial Development
Having a look around the mbed website I find that Richard Sewell has written a notebook page and Noriaki Mitsunaga has published a program for the uCam already. So I have some good starting points.
Both of these projects have a library of sorts but neither appear to be published as a stand-alone library.
Hello World!
As usual the starting point is the hello world program. Which in this form will be a bare bones program which will on this instance will just communicate to the uCam and sync with it.
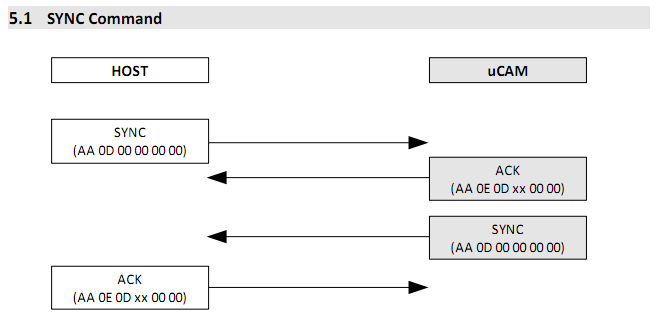
To do this a series of commands and responses need to take place between the mbed and uCam module. This is shown below and is taken from page 13 on the uCam datasheet.

After a bit of development an initial program takes shape and is shown below.
#include "mbed.h"

// Set up some memory to hold the commands
const unsigned char SYNC[] = {0xAA, 0x0D, 0x00, 0x00, 0x00, 0x00};
const unsigned char ACK[] = {0xAA, 0x0E, 0x0D, 0x00, 0x00, 0x00};

int main() {
    Serial uCam (p13, p14);
    Serial pc(USBTX,USBRX);
    // Set up a buffer to hold the uCam response
    unsigned char buf[6] = {0x00, 0x00, 0x00, 0x00, 0x00, 0x00};

    // Set uCam baud rate - this is the highest that uCam will auto detect
    uCam.baud(57600);

    // Start by Initializing communcation to uCam
    pc.printf("\n\r-- uCam Initailse --");

    // This will give 60 attempts to sync with the uCam module
    for (int i=0; i<=60; i ++) {
        // Send out the sync command
        pc.printf("\n\rSending out SYNC command");
        for (int i=0; i<6; i++) {
            uCam.putc(SYNC[i]);
        }

        // Get response from uCam
        if (uCam.readable()) {
            for (int i=0; i<6; i++) {
                buf[i] = uCam.getc();
            }
        }

        // Check if it was an ACK
        if (buf[0] == 0xAA && buf[1] == 0x0E && buf[2] == 0x0D && buf[4] == 0x00 && buf[5] == 0x00) {
            pc.printf("\n\rACK received");
            // Get response from uCam
            if (uCam.readable()) {
                for (int i=0; i<6; i++) {
                    buf[i] = uCam.getc();
                }
            }
            if (buf[0] == 0xAA && buf[1] == 0x0D && buf[2] == 0x00 && buf[3] == 0x00 && buf[4] == 0x00 && buf[5] == 0x00) {
                pc.printf("\n\rSYNC received");
                // Send out an ACK as response
                pc.printf("\n\rSending out ACK command");
                for (int i=0; i<6; i++) {
                    uCam.putc(ACK[i]);
                }
                pc.printf("\n\rSYNC complete after %d attempts",i+1);
                break;
            } else {
                pc.printf("\n\rNo SYNC received - trying again...");
            }
        } else
            pc.printf("\n\rNo ACK received - trying again...");

        if (i == 60)
            pc.printf("\nTesting failed - Too many attempts");
    }
    pc.printf("\n\n\rTest finished!");
}
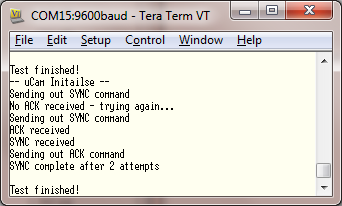
Which when run results in the following output from TeraTerm.

So it looks like everything is working OK and the uCam module is syncing with the mbed after 2 attempts - pretty good, as if you read the datasheet it suggests that it normally takes up to 25 goes!
Next Stage - Speed
I want to do some kind of image processing and with a baud of 57600 it will take too long to transfer the data to the mbed. The maximum baud rate for the uCam module is 1228800 bps so I need to get up towards that.
Looking at the other uCam programs none of them have the facility to increase the baud for the uCam module. So it's back to the datasheet...
The datasheet says that to get a different baud rate you need to send the SET_BAUD command to the uCam. Contained in this are two variables which set a pre-scaler and hence the baud rate. I know the mbed will work with a 921600 baud because I have used it with TeraTerm in the past, but I'm not too sure about 1228800. I will start with the lower baud and once working I'll try it with the faster one.
The calculation is Baud rate = 14.7456MHz / 2 x (2nd Divider + 1) / 2x (1st Divider + 1). So if I send a 1 for both divider2 I get...
Baud rate = 14.7456MHz / 2 x (1 + 1) / 2x (1 + 1) => 14.7456MHz / 16 => 921600 baud
The format from the datasheet is: AA07h, 1st Divider, 2nd Divider, 00h, 00h. So I need to send: 0xAA, 0x07, 0x01, 0x01, 0x00, 0x00 to the uCam module to set the new baud rate to 921600.
So after a while and a bit of head scratching about if I need a delay between sending data to the uCam and getting a response (I do - >1ms) I end up with this function...
int SetBaud(int baud) {
    // Set up a buffer to hold the uCam response
    unsigned char buf[6] = {0x00, 0x00, 0x00, 0x00, 0x00, 0x00};

    // Send out the set baud command
    for (int i=0; i<6; i++) {
        // Select the correct data for the desired baud
        if (baud == 115200)
            uCam.putc(BAUD_115200[i]);
        else if (baud == 921600)
            uCam.putc(BAUD_921600[i]);
        else if (baud == 1228800)
            uCam.putc(BAUD_1228800[i]);
    }
    // Give the uCam 1ms to reply
    wait(0.001);

    // Get response from uCam
    if (uCam.readable()) {
        for (int i=0; i<6; i++) {
            buf[i] = uCam.getc();
        }
    }
    // Check if the response was an ACK
    if (buf[0] == 0xAA && buf[1] == 0x0E && buf[2] == 0x07 && buf[4] == 0x00 && buf[5] == 0x00) {
        // An ACk was received so we can now set the mbed to the new baud rate
        uCam.baud(baud);
        // New baud rate confirmed - return true
        return(1);
    } else
        // Something went wrong - return false
        return(0);
}
Which allows the user to select and switch between different baud rates.
Time for a photo
OK to wrap this up a I want to create a function that takes a photo. Because my end goal is image processing a jpeg image is no good - I want a RAW image.
Looking again at the datasheet to take a photo I first need to send the uCam an INITIAL command - that is to tell it what kind of picture to take (JPEG, RAW, what resolution, colour resolution etc.). After this I can simply use the GET_PICTURE command (if I want an image straight away), or the SNAPSHOT command if I want a delay before taking the picture.
I want the image straight away so I will set it up to take a small RAW format picture (60*80) in 8-bit greyscale. To do this I write a small method called Initial, and send it the desired colour resolution and picture resolution.
This method is shown below - you may notice that by this point I have moved away from functions in a single file and have started writing a library.
int uCam::Initial(unsigned char COLOUR, unsigned char RES) {
    // Set up a buffer to hold the uCam response
    unsigned char buf[6] = {0xAA, 0x01, 0x00, COLOUR, 0x00, 0x00};

    //Amend the initial command for the type of image
    if (buf[3]==0x07) {
        buf[5] = RES;           // The image is a JPEG so set byte 5
    } else {
        buf[4] = RES;           // The image is RAW so set byte 4
    }

    // Send out the initial command
    for (int i=0; i<6; i++) {
        _uCam.putc(buf[i]);
    }

    // Check for ACK
    if (Get_Response(_ACK,0x01)) {
        // An ACk was received - return true
        return(1);
    } else {
        for (int i=0; i<6; i++) {
            printf("\n\r0x%x",buf[i]);
        }
        // Something went wrong - return false
        return(0);
    }
}
I have added in a bit of fault finding code but this can be removed later on.
So all I need to do now is send out the GET_PICTURE command and a pointer to an array to store the resulting bitstream and I should have a picture sitting in memory.
int uCam::Get_Picture(unsigned char *data) {

    // Send out the get picture command
    for (int i=0; i<6; i++) {
        _uCam.putc(GET_PICTURE[i]);
    }

    if(!Get_Response(_ACK,0x04))
        // Something went wrong
        return(0);

    // Get response from uCam
    for (int i=0; i<80*60; i++) {
        data[i] = _uCam.getc();
    }
    // We need a small delay (1ms) from receiving the SYNC response and sending an ACK in return
    wait(0.001);
    for (int i=0; i<6; i++) {
        _uCam.putc(ACK[i]);
    }
    // Everything is now complete so return true
    return(1);
}
Again I can modify this later if needed as it will only take RAW images (byte 1 is set to 0x02 at the minute) which is OK as that is all I'm working with.
Picture test
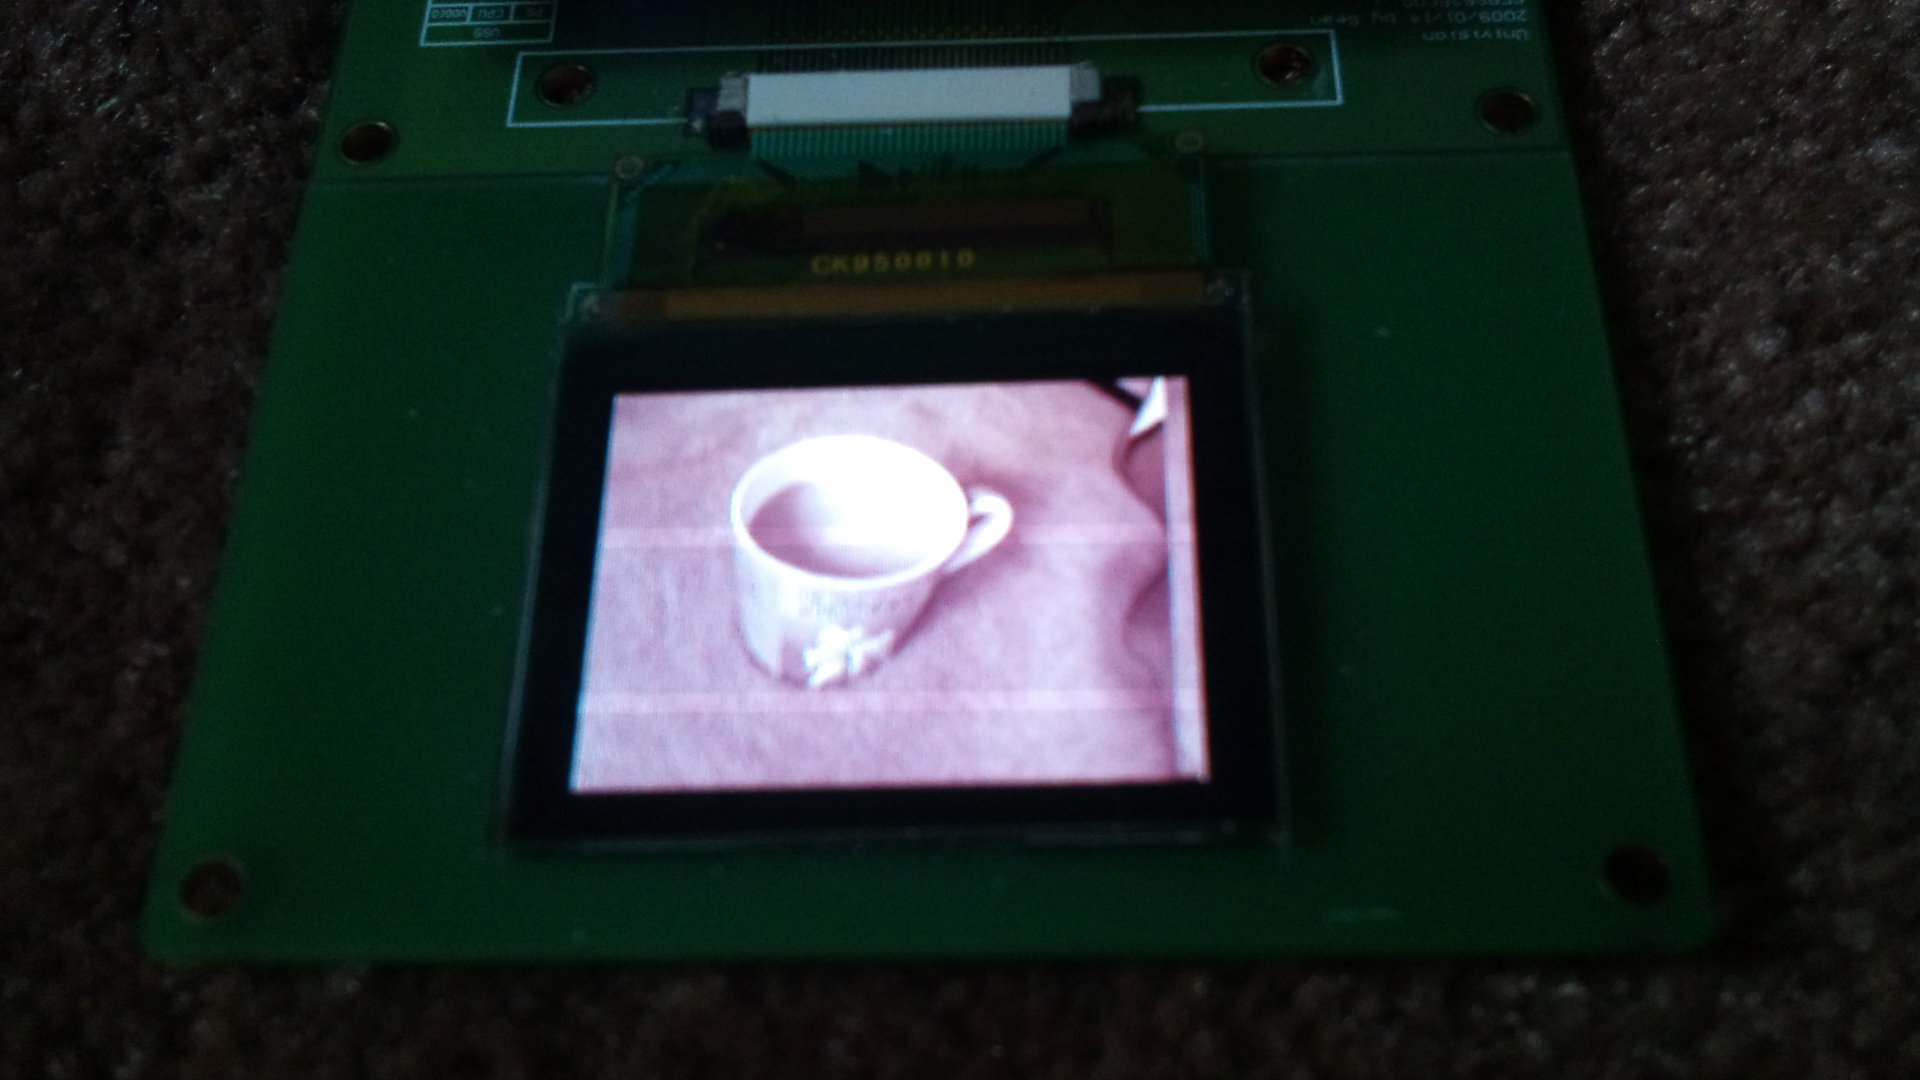
My first test was to take some pictures and display them on a OLED screen. This worked quite well but the screen is not the best for photographing. A sample picture of my cup of coffee being displayed on the OLED screen is shown below.

Conclusions
I think this page is long enough already so I'll keep it brief. I hope to do some image processing using the mbed and uCam module and I think this is possible.
I haven't published a full uCam library as I have only written the methods for the RAW image type. I may publish a more complete library later on.
I'm a bit disappointed with the speed of the uCam. I thought that at 1228800 baud I would be getting around 8fps for a 160*120 image but am only getting about 3fps. I think the uCam module has some built in latency but I will explore more fully later on.
Next onto some image processing and edge detection!
Edit: Library
Added below is a sample library. A word of warning - I started working with uCam for a very specific project and have only used the bits of it that I needed to - hence the library is not a complete one but is should give you something to work with.
Import libraryuCam
A Simple library to capture pictures from the uCam by 4D Systems
7 comments on uCam Development:
Please log in to post comments.

Hiya
I've been looking at the camera and was wondering if you managed to get above 3fps?
Nathan