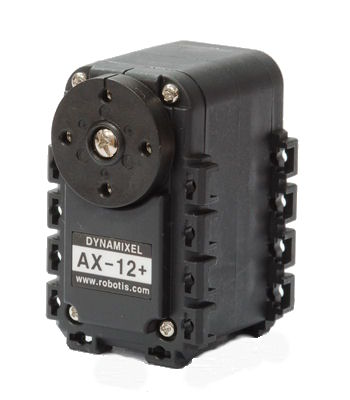
Dynamixel AX-12+
Introduction
This notebook page is all about controlling and using the Dynamixel AX-12+ servo motor.
 | This little beast is a highly featured peice of kit. It's not the cheapest servo money can buy, but it is certainly very versatile, and delivers a serious bang for your buck The headline features are:
Resources:
|
As ever the first step is simply to establish communication with the AX-12. Once we are reliably reading and writing data to the the AX-12 we can think about an API that makes it simple to control
Hello World!
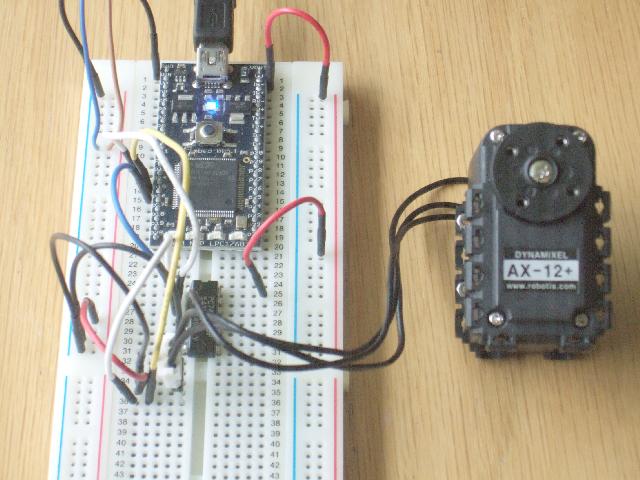
Wiring up
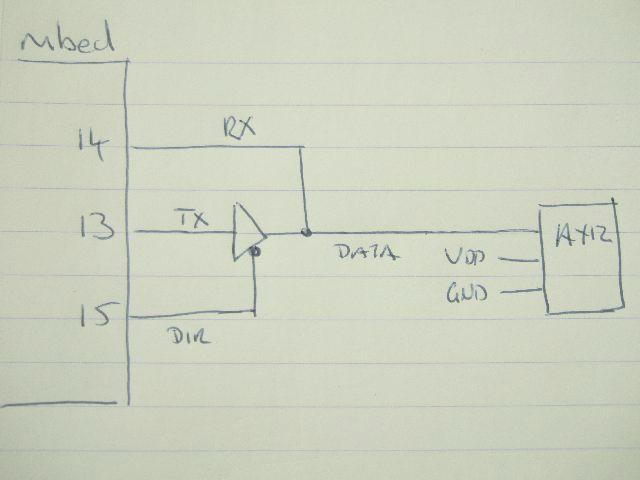
The first thing to note is that this servo uses a serial interface, but it is half duplex i.e, a shared wire for transmit and recieve. This means we need to wire up some external circuit to make sure we switch the transmit pin to high impedance when we wish to recieve. An example circuit is given in the data sheet on page 7, but i'm chosing to do it slightly differently. Firstly I am using a 74HC125, because that is all I had laying around. Secondly, I am not disabling recieve when I am transmitting. This does lead to my transmissions being looped back, but for now that is useful information.
 |
|
Communication protocol
The datasheet has a lot of detailed information about how to communicate with the AX-12. The main points are:
- The master sends out a command packet, which includes and ID, instruction, payload and checksum
- The AX-12 with the matching ID sends a status packet that includes it ID, Error code, data and checksum
The size and makup of the packet depends on what exactly is being done. My first shot will be to send a ping packet, and recieve the reply. The servo factory default is for 1,000,000 bps communication (why such a high and non-standard number?), and the ID defaults to 1. If you wish to have mulitple servos in a bus configuration, you must reconfigure the servos so there are no ID conflicts.
For my simple experiment, the command packet looks like this :
Header : Always 0xFF, 0xFF
ID: Default is 0x1
Packet Length : 0x2 + number of parameters
Instruction : Pin
Checksum : Invert the modulo 256 sum of the ID, Packet Length, Instruction and parameters
Command Packet : 0xFF 0xFF 0x01 0x02 0x01 0xFB
The returned status packet format look like this :
Header : Always 0xFF, 0xFF
ID: Reply from ID
Packet Length : 0x2 + number of parameters, for a ping packet, this is 0x2
Error : This should be 0x0!
Checksum : Invert the modulo 256 sum of the ID, Packet Length, Instruction and parameters
We should expect to see the following :
Status Packet : 0xFF 0xFF 0x01 0x02 0x00 0xFC
The last thing to consider is when to disable the Tx driver. If i do it as soon as I've sent my characters to the Serial transmit buffer, I am likely to be switching off the driver before the buffer has been sent. Similarly, if i leave it too late, the AX-12 will have already replied.
Looking at the AX-12 datasheet it seems that the default "turn around time" is 160us. This means the AX-12 will wait for 160us before replying. I consider the following
- The TxFifo is only one character deep putc blocks until there is space
- At 1Mbps the bit period, is 1us
- With 8 bit characters, 1 start bit and one stop bit, the chacter transmission time is about 10us
So I have to wait more than 10us, but less than 170us (10us + 160us turnaround). I'll start with 40us.
My first test program look like this:
#include "mbed.h"

Serial ax12 (p13,p14);
Serial pc (USBTX,USBRX);

DigitalOut TxEn (p15);

int main() {

    TxEn = 1;       // Disable Tx

    ax12.baud(1000000); // default baud for AX-12
    pc.baud(115200);
    pc.printf("AX-12+ Bringup\n");

    pc.printf("Request status packet from ID #1\n");

    TxEn = 0;         // enable Tx
    ax12.putc(0xff);  // start byte
    ax12.putc(0xff);  // start byte
    ax12.putc(0x01);  // ID2
    ax12.putc(0x02);  // Length = 2; 2 + 0 params
    ax12.putc(0x01);  // Instruction - Ping
    ax12.putc(0xFB);  // checksum

    wait (0.00004);   // wait 40us for Tx to finish
    TxEn = 1;         // disable tx

    while (1) {
        if (ax12.readable()) {
            pc.printf("0x%x\n",ax12.getc());
        }
    }
}
Initially it didnt work, and on closer examination, it looked like setting the baud rate to 1,000,000 wasn't setting the serial port up properly. The settings for prescaler, divider and multipliers were out just enough to mean that the AX-12 wasnt replying.
Simon and Jon do some investigations, tweek the libraries, and before I know it, there is an internal version of the libraries that make it all spring into life. (Version 21).
And the result looks like this :
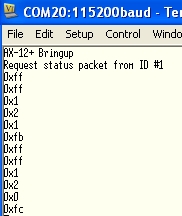
Right, so we have successful communitation, we now need to start building the abstraction.
Building an API
Reading through the datasheet, it is clear that all of the communication with the AX12 servo(s) - remember there can be multiple servos on the bus - is done by exchanging command and status packets. Therefore, the first thing to do is build some low level packet handling functions that deal with the high speed (1Mbit) nitty gritty of communication.
The packets are variable length depending on the instruction, but the basic intent is to read and write registers. So I look to the I2C class for inspiration, and see that the structure used there will fit perfectly. Essentially the concept is address, length and a pointer to a char array which holds the sent or recieved character(s).
My first go at the low level functions looks like this :
int read (int ID, int start, int bytes, char* data);
int write (int ID, int start, int bytes, char* data);
void TxEn (int enable);
These methods are going to be private in the final class implementation, but i'll expose them now so I can call them directly.
My first attempts are all a bit unpredictable. I add lots of printf debug which only seems to make things worse. Then I realise I am doing my printf'ing in as I go along, in between sending bytes of the packet. Probably not wise. So local to each function I create a small buffer that I assemble the packet in (doing all my printf'ing as I go, then whenthe packet is built in RAM, i squirt it out the serial port in one go. Success! But now I notice that my code isnt as nippy as it could be, because of all the constant printf'ing. I add a #defined varaibles to enable the printing of debug messages for the read and write communications, and another one for the general top level debug.
After some minor tweaks, the reading and writing of registers is perfectly robust, so I start to look at how to expose the functionality keeping in mind that methods for the AX-12+ should reflect what you might want to do with it.
Making some changes
Following on from discussions in the office, I decide to make two changes.
The first is that I have been assuming I create one object for the AX-12 serial bus, and then talk to all connected servos using that one object. Instead, I now change the constructor so I pass in in the ID. This means I can now create combinations of servos on different pins, or mutiple objects all using the same pins.
The second change is that Jon has kindly written a SerialHalfDuplex object for the main mbed libraries - which is available in Version 22 onwards. The good thing about this is :
- No external buffer chip
- No additional buffer enable pins, just the serial port
- No pull up resistors
- No characters being echoed, they are consumed (and returned, if you;re interested) by the putc command
To ensure the timing works out, the putc method blocks until it has received the echod character. This gets around the problem of knowing when to switch of the transmit buffer and start receiving. The down side is if you dont actually wire your Tx and Rx pins the first putc will hang you. Jon is looking to make the Half Duplex putc abort after a timeout. In the mean time, wire your circuits properly!
With that out of the way, we can now look at the new shape of the API.
API Methods
AX12(PinName tx, PinName rx, int ID);

int read(int ID, int start, int length, char* data);
int write(int ID, int start, int length, char* data, int flag=0);

// set goal angle in integer degrees
// flags[0] = blocking (only returns when goal reached
// flags[1] = register. Requires broadcast trigger to activate
int SetGoal(int degrees, int flags = 0);

// Mode = 0, positional
// Mode = 1, continuous rotation
int SetMode(int mode);

// Speed is -1.0 (CCW) to 1.0 (CW)
int SetCRSpeed(float speed);

// set these in degrees, CCW limit is 300
int SetCWLimit(int degrees);
int SetCCWLimit(int degrees);

int SetID(int CurrentID, int NewID);

// returns true if the motor is in motion
int isMoving(void);

// broadcast to trigger registered goals
void trigger(void);

// Get current angle, only valid 0-300
float GetPosition();

// In volts and ^C
float GetTemp(void);
float GetVolts(void);
This is pretty well tested now, and infact the LOGO etch-a-sketch over twitter used this class quite happily. As always I am happy to take feedback and suggestions and rework stuff.
In the mean time, your getting started code is here :
- AX12 Hello World - Simple example of an AX12 being used and swept through its full range of 0-300 degrees
- AX12 Library - no main.cpp or mbed.lib
2 comments

You need to log in to post a comment
Dynamixel AX-12+
This page shows the teardown of the Dynamixel AX-12+ servo motor as used in the etch-a-sketch project
ax12, half duplex, Serial, Servo
Page owner:  Chris Styles
Created 27 Apr 2010.
Last updated 10 May 2010
I'm surprised there isn't a way to use the internal pinbuffers to do this (after all, that schematic you drew is *exactly* the same as the internal buffer circuitry for every GPIO pin on the LPC)? Couldn't you just tie Tx and Rx on the mbed together and connect this directly to the servo serial bus? Then you could toggle between transmit and receive by switching the pinmux for the Tx pin between serial tx and gpio input (i.e. high-impedance). You'd get the same loop back characteristics as well.