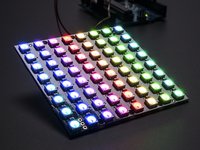
NeoPixel NeoMatrix 8x8
8x8 matrix array of individually addressable RGB LEDs
Hello World
Import programNeoMatrix_Demo
An example program using the NeoMatrix library to control an Adafruit NeoPixel 8x8 NeoMatrix (http://www.adafruit.com/products/1487)
Last commit 17 Mar 2015 by  Taylor Powell
Library
Import libraryNeoMatrix
NeoPixel NeoMatrix 8x8 RGB LED library. Product found at https://www.adafruit.com/products/1487. NeoCore.s from Allen Wild's NeoStrip library: http://developer.mbed.org/users/aswild/code/NeoStrip/
Last commit 17 Mar 2015 by Taylor Powell
Pinout
Datasheet
https://www.adafruit.com/products/1487Notes
The NeoPixel NeoMatrix 8x8 is an array of individually addressable LEDs, that can be communicated with the same as any NeoPixel products.
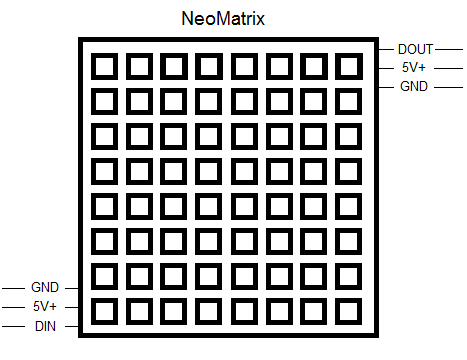
Wiring
The NeoMatrix has pins that tie to the mbed ground and 5V power output (VU), as well as a data pin which can be tied to any analog out pin.
| mbed | NeoMatrix |
|---|---|
| gnd | GND |
| VU(5V) | 5V+ |
| p18 | DIN |
Large numbers of NeoMatrix can be chained together by tying Dout to Din on each board, and leaving the last Dout floating. Power and ground can also chain along through the arrays to save on wiring.

Brightness
Brightness can be set for the entire board using a the brightness function in the library, however it should be noted that a larger brightness will draw more current and may require an external power supply.
Demo
Note: In order to better capture on video, the brightness was reduced from NeoMatrix_Demo, and coupled with video quality produced apparent flickering that is not naturally present.
Using the Library
The library comes with several prebuilt visual functions that help streamline using the NeoMatrix array. These functions are listed below. Many of the functions are listed twice so as to provide the functionality of being called with a bit packed color input or three separate input for RGB values.
Import library
Public Member Functions |
|
| NeoArr (PinName pin, int N) | |
|
Create a
NeoArr
object.
|
|
| void | setBrightness (float bright) |
|
Sets the brightness of the entire array.
|
|
| void | setPixel (int idx, int x, int y, int color) |
|
Set a single pixel in the array to a specific color.
|
|
| void | setPixel (int idx, int x, int y, uint8_t red, uint8_t green, uint8_t blue) |
|
Set a single pixel in the array to a specific color with reg, blue, and blue values in seperate arguments.
|
|
| void | drawLine (int idx, int x1, int y1, int x2, int y2, int color) |
|
Draws a line of a specific color between any two points.
|
|
| void | drawLine (int idx, int x1, int y1, int x2, int y2, uint8_t red, uint8_t green, uint8_t blue) |
|
Draws a line of a specific color between any two points with reg, blue, and blue values in seperate arguments.
|
|
| void | drawRect (int idx, int x1, int y1, int x2, int y2, int color) |
|
Draws a rectangle outline of a specific color given two opposite corner points.
|
|
| void | drawRect (int idx, int x1, int y1, int x2, int y2, uint8_t red, uint8_t green, uint8_t blue) |
|
Draws a rectangle outline of a specific color given two opposite corner points with reg, blue, and blue values in seperate arguments.
|
|
| void | drawFilledRect (int idx, int x1, int y1, int x2, int y2, int color) |
|
Draws a filled rectangle of a specific color given two opposite corner points.
|
|
| void | drawFilledRect (int idx, int x1, int y1, int x2, int y2, uint8_t red, uint8_t green, uint8_t blue) |
|
Draws a filled rectangle of a specific color given two opposite corner points with reg, blue, and blue values in seperate arguments.
|
|
| void | fillScreen (int idx, int color) |
|
Fills the entire array screen with one color.
|
|
| void | fillScreen (int idx, uint8_t red, uint8_t green, uint8_t blue) |
|
Fills the entire array screen with one color with reg, blue, and blue values in seperate arguments.
|
|
| void | drawTriangle (int idx, int x1, int y1, int x2, int y2, int x3, int y3, int color) |
|
Draws a triangle outline of a specific color given three corner points.
|
|
| void | drawTriangle (int idx, int x1, int y1, int x2, int y2, int x3, int y3, uint8_t red, uint8_t green, uint8_t blue) |
|
Draws a triangle outline of a specific color given three corner points with reg, blue, and blue values in seperate arguments.
|
|
| void | drawFilledTriangle (int idx, int x1, int y1, int x2, int y2, int x3, int y3, int color) |
|
Draws a filled triangle of a specific color given three corner points.
|
|
| void | drawFilledTriangle (int idx, int x1, int y1, int x2, int y2, int x3, int y3, uint8_t red, uint8_t green, uint8_t blue) |
|
Draws a filled triangle of a specific color given three corner points with reg, blue, and blue values in seperate arguments.
|
|
| void | drawChar (int idx, int x, int y, char c, int color) |
|
Draws a single 6x8 character on the array.
|
|
| void | drawChar (int idx, int x, int y, char c, uint8_t red, uint8_t green, uint8_t blue) |
|
Draws a single 6x8 character on the array.
|
|
| void | showImage (int idx, const int *colors) |
|
Displays a 64 bit image on board idx.
|
|
| void | clear () |
|
Clears all pixels on all boards (sets them all to 0)
|
|
| void | write () |
|
Write the colors out to the strip; this method must be called to see any hardware effect.
|
|
Example Implementations
The following examples are taken from the HelloWorld code "NeoMatrix_Demo" provided above. Many of these functions become very visually versatile when used in combinations with for-loops as demonstrated.
// Horrizontal scroll x y z
        for(char c = 'x'; c <= 'z'; c++)
            for(int i=7;i>=-6;i--){
                array.clear();
                array.drawChar(0,i,0,c, 255,255,255);
                array.write();
                wait_ms(100);
                }
Using a simple for-loop, the illusion of motion can be very easily achieved with the NeoMatrix array. Here, the exterior for-loop is used to cycle through characters, while the interior for-loop clears screen (which is necessary to not leave visual artifacts) and then decrements the x co-ordinate of the starting point of the character so that it will more across the screen. The co-ordinate (0,0) is the bottom left most pixel of the screen and so decrementing the x co-ordinate moves the characters from right to left. If vertical movement is desired, then simply decrement the y co-ordinate input as is done later in the example code. As with any update to the screen an array.write() call is needed to push the update to the screen, and a wait function is used to make the motion easier to follow.
// Fill screen with gradient of colors
        for(int n = 0; n<=255; n++){
            array.fillScreen(0,n,0,255-n);
            array.write();
            wait_ms(5);
            }
Here a for-loop is used to gradually change the color of the entire screen from blue to red. By using complementing inputs of [n] and [255-n] within the RGB inputs, the change is both synchronized in decreasing the blue content and increasing the red content of the screen, and produces a very smooth transition. Because the RGB values are each 8 bits packed together, 255 is the maximum value any of these components can hold, such that the at start of the loop RGB=(0,0,255) would be full blue content, and the end of the loop RGB=(255,0,0) would be full red content.
// Red and green pinwheel
        for(int i=0; i<8; i++){
            array.clear();
            array.drawLine(0,i,0,7-i,7,Red);
            array.drawLine(0,7,i,0,7-i,Green);
            array.write();
            wait_ms(100);
            }
        for(int i=1; i<=6; i++){
            array.clear();
            array.drawLine(0,7,i,0,7-i,Red);
            array.drawLine(0,i,0,7-i,7,Green);
            array.write();
            wait_ms(100);
            }
This code creates a red and green spinning X across the screen. The first for-loop handles the first half of the rotation, with each line moving across one edge. By using a complementary x or y pair (for each respective color) of [i] and [7-i] The line will always cross through the center of the board. Additionally, by setting the other x-y inputs to [0] and [7] the lines will hold to the parallel edges and thus span the entire screen. The second for-loop is needed to then move each color to the next set of parallel edges and thus complete the full rotation.
for(int i=0; i<4; i++){
            array.clear();
            array.drawFilledRect(0,i,i,7-i,7-i,Blue);
            array.write();
            wait_ms(250);
            }
This code will shrink a rectangle that spans the entire screen into the center point of the screen. In order to get the rectangle to shrink into the center, the for-loop only needs to increment the variable i to half the width of the screen, so that the inputs [i] and [7-i] will thus range from the edge of the screen to as near the midpoint as possible (because there is an even number of pixels there is no exact middle pixel, but rather a middle 2x2 pixel section).
 // Rotate purple triangle
        for(int i=0; i<8; i++){
            array.clear();
            array.drawFilledTriangle(0,i,0,0,7-i,7,i, 255,0,255);
            array.write();
            wait_ms(250);
            }
The triangle shape probably loses the most resolution of any shape when it is not using either 45 or 90 degree angles. This is due entirely to the resolution capabilities of the 8x8 screen. However, this code demonstrates the ability to rotate a triangle from one corner of a screen to another by using a for-loop to synchronize moving the vertices so as to try to keep the best visual fidelity. Also by keeping the triangle vertices at the edges of the screen a somewhat higher resolution can be achieved throughout the rotation. It should also be noted that since the vertices of this triangle are moving each perpendicular to one another it is not a perfect rotation (which would maintain size by moving each vertex in a circle) but an approximate rotation.
#define Color(r, g, b)  ((r&0xFF)<<16 | (g&0xFF) << 8 | (b&0xFF))

#define Red     (Color(255,0,0))
#define Green   (Color(0,255,0))
#define Blue    (Color(0,0,255))
The preceding code does not actually use any of the library functions, but is important to demonstrate how to efficiently bit pack colors, and also define colors for use in functions within a macro.
You need to log in to post a discussion