mbed + Pololu 3pi = fun! (Part 1)

We're doing some experiments to add an mbed brain and bluetooth to the already awesome 3pi robot base from Pololu. The plan is that it can be remotely controlled from a PC or phone application over bluetooth, scripted, or made fully autonomous robot such as a line follower.
The big plan is to run a "Robot Racing" event at the upcoming ARM Techcon with it, all controlled via android devices. We'll also publish all the design files so anyone can build one! Here is where we've gotten so far...
We started by looking at the software side of how to control the 3pi robot base. A search on the Pololu website struck gold almost immediately, as they've written some firmware for the robot MCU that means that it can be controlled externally by sending commands and parameters to it over a UART. It is called the "3pi Serial Slave" example, and exposes a control interface over the UART at 115,200bps, so would be nice and responsive.
The code and libraries are published along with some great instructions and tutorials about how to get the firmware built (it needs AVR Studio IDE, WinAVR GCC compiler and some Pololu libraries; having to install an IDE, toolchain and library did seem a bit retro though :-) With the firmware built, the next problem was how to actually get the image into the 3pi. Well, Aaron had written an AVR ISP routine so that mbed can flash AVR chips (check out Aarons AVR ISP page), so with a few wires the mbed happily programmed the 3pi with the Serial Slave program! Excellent!
From a hardware perspective, there is a rather convenient expansion kit, including hardware an connectors (expansion kit). A quick look at the schematics, and it is obvious how to hook it all up, so in no time at all, mbed was mounted.
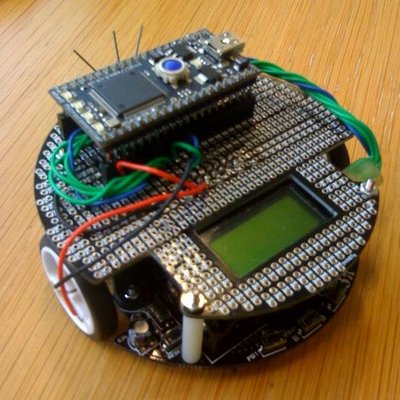
The software on the mbed side is where things get interesting, as this is where all the possibilities are. The first experiments with simple control, sending motor values all go very well, and soon, it is time to be more adventurous. The first adventure is the start of an API. At this point I decide that mbed + 3pi is now called "m3pi", and so I set about building a class to expose the 3pi to the mbed developers. At the most basic level we have this :
void left_motor (float);
void right_motor (float);
Each motors is controlled with a floating point value between -1.0 and 1.0 to encode the full speed in both directions. All movement can be built on top of this control interface.
The next inspiration came from Michael Walker, who suggested that we should make the m3pi class RPC'able. A great idea that meant that control could conceptually come from anywhere. The logical step then was to make it RPC'able over a bluetooth link.
Enter the Roving Networks RN42 bluetooth module. This exposes itself to the system as a serial port, and when it pairs with a device it automatically enters data mode, so it is really very simple to use. So now we have a bluetooth device that we can pair with all sorts of interesting devices, which can then control the m3pi motors by RPC calls.
With an androider hacker to hand and one quick app later, proportional control of the motors was done using RPC calls from an Android phone over bluetooth, and naturally, the accelerometers were the obvious input device. As accelerometers are rather noisy, some over sampling and low pass filtering was needed in software to help the control be as smooth as possible. Here are the results:
So, the culmination of all this hackery was that all the hardware, programming, interface, protocol and communication steps have been solved, and we can drive the 3pi robot using an android phone. This is just a first prototype, but it proves the idea!
Stay tuned for a follow up where we'll show you how we get on with improving the hardware and building up the software...
You need to log in to post a comment