Hands-on: ST Nucleo board with a shield
The mbed platform support has been expanded recently to include a new family of boards - the ST Nucleo. Four boards are supported at the time of this writing and ST's plans are to release a full line of STM32 Microcontrollers in the Nucleo family, all of which will have out-of-the-box support for the mbed ecosystem. In this blog post I'll show you how easy it is to use the a ST Nucleo board on mbed.
First, this is how the board packaging looks (click to enlarge):


When connected for first time, the green LED blinks with a familiar rate, hinting that the preloaded program is in fact the mbed Blinky Hello World program. The USB storage device of the Nucleo contains an mbed.htm file, which, when clicked, takes me to the mbed website and gets the board added to my account.
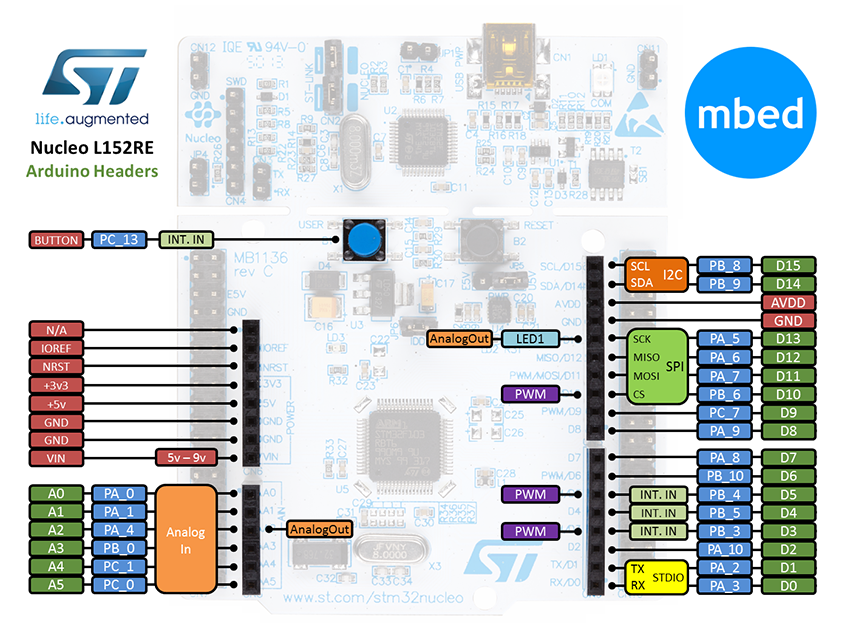
Like the whole Nucleo family, the ST Nucleo L152RE has 2 type of headers - Arduino and Morpho. The Arduino header standard is popular for the compatibility and ease of use it offers. In this example I'm using the Arduino shield 16x2 LCD by Freetronics.


This LCD already has a page in mbed Components, which provides an example program and library contributed by Koen Kempeneers.

Clicking on “Import program” takes me to the mbed Online Compiler to import the program into my workspace.

I'm opening main.cpp and the first thing I notice is that the initialization string for the LCD library is using Arduino pin names, meaning that I won't have to change them - everything is pre-set for me.
freetronicsLCDShield lcdshield(D8, D9, D4, D5, D6, D7, D3, A0);
Тhe second thing I notice is that the program is more than a Hello World program. It's a full-featured demo of the shield and library, which is somewhat too complex for my example.
I'm replacing the code with the simplified:
main.cpp
#include "mbed.h"
#include "freetronicsLCDShield.h"

freetronicsLCDShield lcdshield(D8, D9, D4, D5, D6, D7, D3, A0);

int main() {
    lcdshield.setBackLight(true);
    lcdshield.printf("mbed application");
}
And then hit "Compile" which successfully compiles my code and prompts me for a save location.
But before saving the compiled binary I'd like to attach the LCD shield. Note that some shields, like this LCD screen, use less pins than the full Arduino headers, so remember to be extra careful when attaching them. If you get it wrong you might damage the board and/or the shield.
Now that I have the LCD shield correctly mounted, I reconnect the board to the PC. The backlight turns on and the first row of the display filled with squares indicating that it's powered properly.

I then save the binary to the Nucleo’s USB storage device, which “consumes” the binary and restarts the board. A moment later the following text appears on the LCD screen:

Ah, sweet success!
7 comments on Hands-on: ST Nucleo board with a shield:


You need to log in to post a discussion
Questions
 Jeremy Nickel
 9 years, 7 months ago
Thanks Mihail for sharing this demo !